Optimizing a Lyophilization Cycle for Peptides: Setpoints That Work
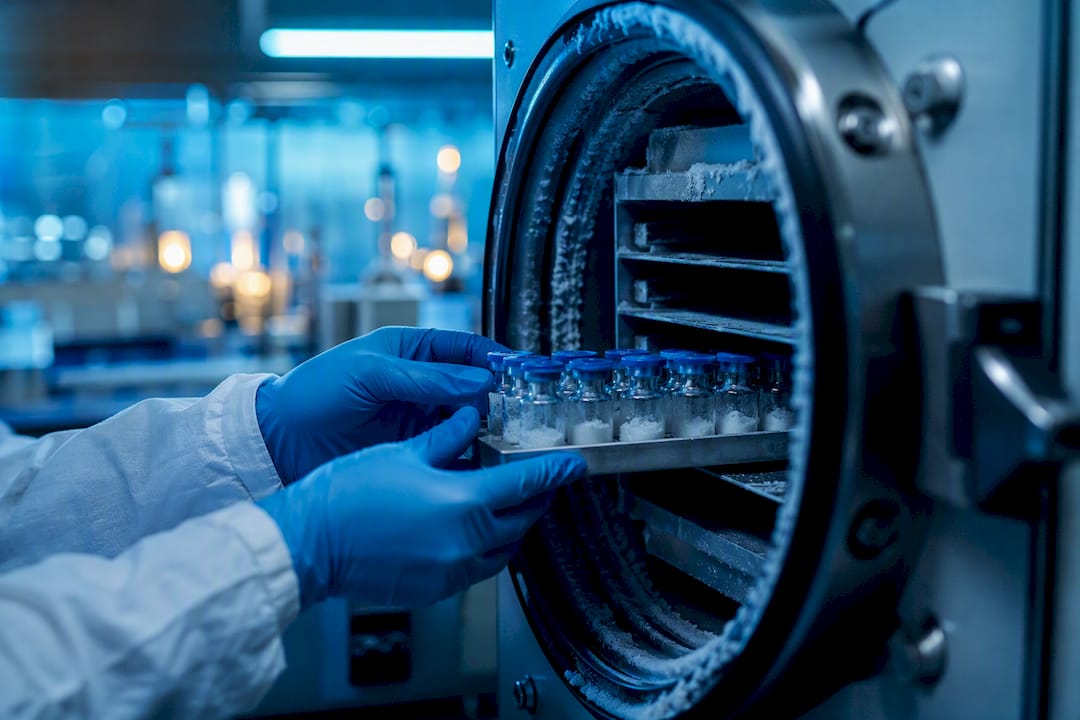
A robust lyophilization cycle for peptides controls three variables: freeze rate, shelf temperature during drying, and endpoint moisture. Freeze at 0.5–1.0°C/min with an annealing hold when the formulation contains a crystallizing bulking agent like mannitol. Run primary drying with chamber pressure at 50–150 mTorr and shelf temperatures set to keep product temperature at least 2–5°C below the collapse temperature (Tc).
Before trusting any cycle, verify it. Place product thermocouples in representative vials, not just edge positions prone to radiant heating. Confirm residual moisture with Karl Fischer titration rather than loss-on-drying, which overestimates water content in peptide cakes. Inspect cake structure visually for shrinkage, collapse, or meltback before releasing a batch for further testing.
Quick validation checklist:
Confirm Tg’ and Tc were measured for the actual formulation, not assumed from literature values.
Check thermocouple traces for convergence to shelf temperature (a proxy for sublimation completion).
Run Karl Fischer on at least three vials per shelf position.
Inspect cakes for uniform structure and absence of collapse or fogging on the vial wall.
Test reconstitution time and clarity before accepting the cycle as final.
Statistic to anchor your target: cycles built around chamber pressures of [50–150 mTorr] and secondary drying to +25–+40°C](https://doi.org/10.1134/s0040579526600476) is the practical range used to bring peptide formulations under 1% residual moisture, a threshold widely tied to suppressing hydrolysis and deamidation in parenteral peptide products.
TL;DR:
Verifying Tg’ and Tc for each formulation is crucial, as incorrect measurements can lead to cake collapse or prolonged drying times.
Freezing at 0.5–1.0°C/min and annealing between −15°C and −20°C improve pore structure and prevent crystallization issues during primary drying.
Maintaining product temperature 2–5°C below Tc during primary drying and using multiple endpoint methods ensure effective sublimation without cake damage.
Secondary drying should be controlled at +25°C to +40°C, with residual moisture kept below 1% to minimize hydrolysis and deamidation risks.
Consistent starting material, proper documentation, and validation across batches are essential for cycle reliability, not just cycle duration.
Table of Contents
What Happens During the Three Phases of a Peptide Lyophilization Cycle?
How Do Excipients Change Peptide Lyophilization Cycle Design?
What Are Tg’ and Tc, and How Do You Measure Them Safely?
What Freezing Rate and Annealing Schedule Work Best for Peptides?
How Do You Control Primary Drying and Know When It’s Done?
Where Should Secondary Drying End for Peptide Stability?
Why Do Lyophilization Cycles Fail, and How Do You Fix Them?
What Should You Document Before Accepting a Peptide Lyophilization Cycle?
How Should Lyophilized Peptides Be Reconstituted and Stored?
What Should You Request to Verify a Lyophilized Peptide Batch?
What Actually Determines a Reliable Lyophilization Cycle?
Where PeptidesFromChina Fits Into Your Lyophilization Cycle Work
Key Takeaways
Sources
What Happens During the Three Phases of a Peptide Lyophilization Cycle?
Every lyophilization cycle for peptides moves through freezing, primary drying, and secondary drying, and each phase stresses the molecule differently. Understanding the mechanism behind each phase is what lets you predict failure before it shows up in a finished cake.
Freezing converts free water into ice crystals, concentrating the peptide and excipients into an amorphous or crystalline interstitial phase. This step generates the pore network that vapor will later travel through, but it also concentrates the peptide at ice interfaces, a known driver of unfolding and aggregation for surface-active molecules.
Primary drying removes ice by sublimation under vacuum. Chamber pressure and shelf temperature control the sublimation rate, and the pore structure from freezing determines how much resistance vapor encounters on its way out. A cycle with fine, dense pores from slow, uncontrolled nucleation dries more slowly than one with coarser channels from annealed or nucleated ice.
Secondary drying desorbs bound water that ice formation never touched. This phase determines final residual moisture and is where hydrolysis and deamidation risk gets locked in or avoided, since bound water left behind at room temperature storage drives most long-term chemical degradation.
Peptides face distinct risks at each stage. Freezing imposes conformational stress and cryoconcentration; primary drying risks structural collapse if product temperature exceeds Tc; secondary drying, if too aggressive, can degrade thermally labile sequences even after the ice is gone.
How Do Excipients Change Peptide Lyophilization Cycle Design?
Excipient choice is not a formulation afterthought. It dictates your freezing profile, whether you need to anneal, and where your collapse temperature sits.
Sucrose and trehalose form amorphous glasses that vitrify around the peptide, preserving structure through the glass transition mechanism. Mannitol, by contrast, crystallizes during freezing or annealing and functions as a bulking agent that gives the cake mechanical strength, but it does not protect the peptide through hydrogen bonding the way an amorphous sugar does. Many cycles use a sucrose or trehalose and mannitol blend specifically so the mannitol crystallizes out during annealing while the sugar stays amorphous around the peptide.
That split matters for your cycle parameters:
Amorphous formers (sucrose, trehalose) lower Tg’ and generally require more conservative shelf temperatures during primary drying to avoid collapse.
Crystalline bulking agents (mannitol) need an annealing step to fully crystallize, or you risk mannitol crystallizing unpredictably later in secondary drying or storage, distorting the cake.
Surfactants like Polysorbate 20 or Polysorbate 80 occupy the ice-water and air-liquid interfaces preferentially, which reduces peptide adsorption and unfolding at those interfaces during freezing and drying, an effect documented in nanocarrier-associated peptide systems.
Buffer choice (histidine vs. phosphate) affects freeze concentration behavior. Phosphate buffers are prone to pH shifts during freezing as one salt crystallizes preferentially, which can drive peptide degradation; histidine buffers tend to resist this shift better across a wider concentration range.
Concentration and viscosity also drive fill-volume decisions. Higher peptide or excipient concentration raises solution viscosity, which increases resistance to vapor flow during primary drying and can extend cycle time meaningfully at the same shelf temperature and pressure.
Pro Tip: Screen your excipient system with differential scanning calorimetry before locking a cycle. A ternary sucrose-mannitol-surfactant blend can shift Tg’ by several degrees compared to sucrose alone, and that shift changes your safe shelf temperature ceiling.
What Are Tg’ and Tc, and How Do You Measure Them Safely?
Tg’, the glass transition temperature of the maximally freeze-concentrated solution, and Tc, the collapse temperature observed under the microscope, are the two numbers that define your safe operating window for primary drying. Get these wrong and you either collapse the cake or waste days running an overly conservative cycle.
Differential scanning calorimetry (DSC) identifies Tg’ by detecting the subtle shift in heat capacity as the freeze-concentrated amorphous phase transitions from glassy to rubbery. Freeze-dry microscopy (FDM) complements this by letting you watch the sample under vacuum on a temperature-controlled stage, so you can visually pinpoint the exact temperature where the structure loses mechanical integrity and collapses. Tc typically runs a few degrees above Tg’, and for peptide formulations, running both tests rather than relying on DSC alone catches discrepancies that matter in practice.
Apply a safety margin once you have both numbers:
Keep product temperature 2–5°C below Tc during primary drying, not just below Tg’.
Re-run thermal characterization any time you change excipient ratios, buffer, or peptide concentration. A margin verified for one formulation does not transfer to a reformulated batch.
Document the DSC thermogram and FDM images alongside the numeric Tg’/Tc values. Reviewers and contract manufacturers accepting a cycle transfer expect thermal characterization plots as part of the minimal technical dossier.
Statistic to anchor this section: in one nanomicelle-associated peptide system, the optimal phospholipid concentration range for reproducible cakes was 10–15 mM, narrow enough that concentrations above or below it changed shrinkage behavior and micelle-micelle interaction during drying. That precision is the standard you should hold your own formulation screening to before finalizing a cycle.
What Freezing Rate and Annealing Schedule Work Best for Peptides?
Freezing sets the pore architecture that every later phase depends on, and getting the rate wrong costs you time in primary drying that you can never fully recover.
Cool at 0.5–1.0°C/min to a terminal freeze temperature typically between −40°C and −50°C, adjusted based on your measured Tg’. Faster rates produce smaller ice crystals and finer pores, which slow sublimation; slower, more controlled rates produce coarser pores that dry faster but risk larger ice crystal damage to sensitive peptide structures.
Anneal at −15°C to −20°C for 2 to 4 hours when your formulation contains mannitol or another crystallizing excipient. This hold promotes Ostwald ripening, where smaller ice crystals dissolve and redeposit onto larger ones, coarsening the pore network and giving mannitol time to fully crystallize before primary drying begins.
Use controlled nucleation where your equipment supports it. Pressure-ramp nucleation or ice-fog seeding narrows the distribution of ice crystal sizes across a batch, which reduces vial-to-vial variability in primary drying time, a real problem in unnucleated freezing where nucleation temperature can vary by several degrees between vials on the same shelf.
Annealing does double duty for peptide formulations. Beyond crystallizing mannitol, the ripened pore structure it creates measurably shortens primary drying by lowering the resistance vapor faces on its way out of the cake. Skip annealing on a mannitol-containing formulation and you risk mannitol crystallizing unpredictably during secondary drying or shelf storage instead, which can physically disrupt an already-dried cake.
Sample size and batch position matter more than most protocols acknowledge. Edge vials on a shelf freeze and dry differently than center vials due to radiant heat from chamber walls, so any annealing or nucleation strategy needs validation across shelf positions, not just a single representative vial.
How Do You Control Primary Drying and Know When It’s Done?
Primary drying setpoints follow directly from your Tg’/Tc data: chamber pressure at 50–150 mTorr, with shelf temperature raised in controlled steps as long as product thermocouples confirm you are staying below the collapse threshold.
Start conservative on the first cycle run for a new formulation. A shelf temperature ramp of 0.1–0.3°C/min up to your calculated maximum, held there while monitoring, gives you room to catch early signs of collapse before it propagates through the batch. Once you have confidence in the margin, later cycle iterations can step shelf temperature up faster or reduce chamber pressure incrementally to shorten total drying time.
Three end-point detection methods work together better than any single one alone:
Product thermocouple convergence to shelf temperature signals that sublimation has largely finished in monitored vials, since ice sublimation keeps product temperature suppressed below shelf temperature until the ice front is gone.
Pirani versus capacitance manometer divergence detects the same endpoint chamber-wide. The Pirani gauge reads pressure based on gas thermal conductivity, which is sensitive to water vapor; the capacitance manometer reads true pressure. When the two converge, water vapor has largely cleared the chamber.
Pressure rise tests (isolating the chamber briefly and watching for pressure increase) confirm no significant sublimation is still occurring.
Pro Tip: Don’t rely on thermocouples alone for the endpoint call. Thermocouple-monitored vials often finish sublimation before unmonitored vials elsewhere on the shelf, because the thermocouple wire itself can act as a heat conduction path. Cross-check with the Pirani/manometer comparison before ending primary drying chamber-wide.
Shortening primary drying without risking collapse comes down to incremental, verified changes: raise shelf temperature or drop chamber pressure by small steps, confirm product temperature stays below Tc at each step with fresh thermocouple data, and only then commit that adjustment to your standard cycle.
Where Should Secondary Drying End for Peptide Stability?
Secondary drying removes the water that ice sublimation never reached, and it is the phase most directly tied to long-term chemical stability of the peptide.
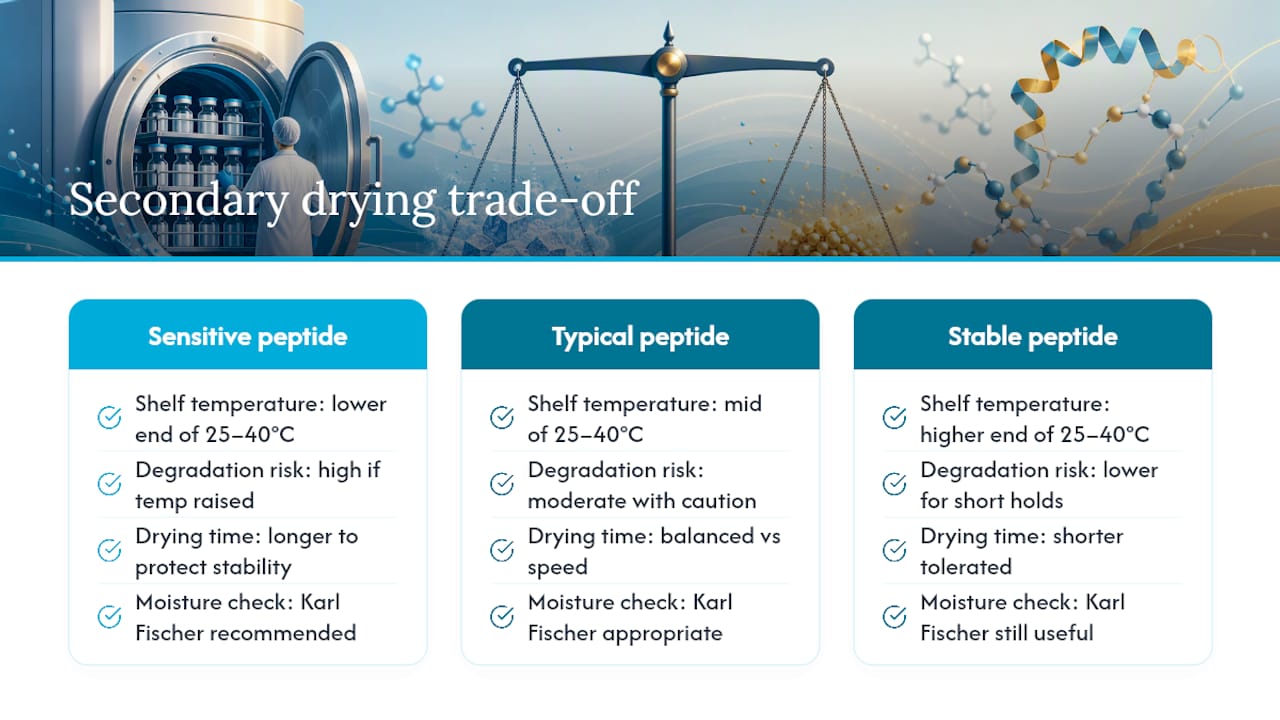
Ramp shelf temperature slowly up to a hold in the general range of +25°C to +40°C. Thermally sensitive peptides or those prone to deamidation are usually dried at lower temperatures within this range to prevent degradation, while more stable sequences can tolerate higher temperatures for shorter drying times.
Karl Fischer directly measures water through a chemical reaction rather than inferring it from weight loss, making it the appropriate method when residual moisture claims will support a stability or regulatory dossier.
Statistic to anchor this section: a low residual moisture content is widely targeted during design to suppress hydrolysis and deamidation in parenteral peptide products, which makes this endpoint, not total cycle time, the number worth protecting when you’re tempted to push secondary drying temperature higher.
The trade-off is real. Higher secondary drying temperatures shorten desorption but raise degradation risk for labile sequences even with ice long gone. Run a temperature-time matrix during development, not a single-point cycle, so you know how much margin exists between your moisture target and the temperature where degradation starts climbing.
Why Do Lyophilization Cycles Fail, and How Do You Fix Them?
Most cycle failures trace back to one of three visible defects, and each points to a specific corrective action rather than a full cycle redesign.
Collapse (a cake that loses its vertical structure and looks shrunken or glassy) almost always means product temperature exceeded Tc during primary drying. Re-check your thermal characterization data first. If Tc was measured correctly, check thermocouple placement, since a probe touching the vial wall reads artificially low and can mask an actual excess.
Meltback (localized melting near the end of primary drying) usually indicates the shelf temperature ramp outpaced the actual sublimation front, or chamber pressure control lagged during a shelf temperature step change. Slow down the ramp rate and verify chamber pressure stability at each step.
Shrinkage without full collapse often signals a formulation issue rather than a cycle issue: insufficient bulking agent, or a crystallizing excipient that didn’t fully crystallize because annealing was skipped or too short.
Reconstitution failures deserve separate triage. Slow dissolution or visible particulates after adding diluent can stem from either the drying cycle (residual moisture too high, leaving a denser cake) or the formulation itself (insufficient surfactant, wrong buffer, or peptide aggregation predating lyophilization). Cross-reference Karl Fischer results and cake appearance against reconstitution behavior before assuming the formulation is the problem, and consult a structured troubleshooting approach when solubility issues persist across otherwise well-executed cycles.
When comparing runs to optimize a cycle, overlay thermocouple traces, chamber pressure logs, and Karl Fischer results side by side across batches. A single passing run does not validate a cycle; consistency across at least three runs at the same setpoints does.
What Should You Document Before Accepting a Peptide Lyophilization Cycle?
A finished cycle needs equipment, a minimum dataset, and numeric acceptance criteria before you call it validated. Skipping any of the three makes cycle transfer to another site or a contract manufacturer far harder later.
Equipment and consumables:
Freeze-dryer with shelf temperature control and, ideally, a controlled-nucleation option
Vials and stoppers rated for lyophilization (verified fit and low extractables)
Calibrated product thermocouples placed in representative vial positions
Karl Fischer titrator for residual moisture verification
The minimum dataset every validated run should produce includes product thermocouple traces for the full cycle, chamber pressure trace, shelf temperature log, Karl Fischer residual moisture results across multiple vials, and reconstitution time and appearance notes.
Parameter Example Acceptance Limit Residual moisture (Karl Fischer) Below 1.0% w/w Product temperature during primary drying At least 2°C below measured Tc Reconstitution time Within a defined time window (formulation-specific) Cake appearance No visible collapse, shrinkage, or meltback
A lab can adapt these limits during development. What matters is defining them before a cycle is called final, and documenting them the same way for every batch, a practice supported by operational sourcing and synthesis guidance for teams managing cycle transfer between development and larger-scale production.
How Should Lyophilized Peptides Be Reconstituted and Stored?
Reconstitution technique affects both peptide activity and how cleanly your validation data reads. Add diluent slowly down the vial wall rather than directly onto the cake, and mix gently by swirling rather than vortexing, which can introduce shear stress and air-water interfaces that promote aggregation in surface-sensitive peptides.
Some peptide-nanocarrier systems require an equilibration period after reconstitution, roughly two hours in one documented study, before functional assays reflect true activity. Standardize and record whatever equilibration time your specific formulation needs rather than assuming immediate readiness.
After reconstitution and in storage:
Use reconstituted material within the time window your stability data supports, and keep it refrigerated rather than at room temperature during that window.
Maintain sterile technique throughout, since a lyophilized cake offers no antimicrobial protection once diluent is added.
Store lyophilized vials with intact stopper seals, away from light and humidity, at the temperature your stability studies validate.
Properly lyophilized peptides consistently show better long-term stability than the same peptide held in solution, a gap documented in comparative stability data. For step-by-step reconstitution guidance specific to common research peptides, a dedicated reconstitution guide covers diluent selection and volume calculations in more detail than fits here.
What Should You Request to Verify a Lyophilized Peptide Batch?
A certificate of analysis tells you little if it stops at assay purity. For lyophilized peptide batches, the documents worth asking for go further:
Assay/purity data alongside water content measured by Karl Fischer, not loss-on-drying
Residual solvent testing where synthesis chemistry warrants it
Sterility and endotoxin data when the intended research use requires it
Batch traceability tying the certificate of analysis to a specific manufacturing lot, not a generic product specification
The gap between a reseller passing along a generic specification sheet and a supplier providing lot-specific Karl Fischer results, batch manufacturing records, and third-party testing evidence is the single clearest signal of whether a peptide’s lyophilization cycle was actually controlled or simply assumed adequate.
Lot-to-lot comparability data matters as much as any single certificate. A supplier who can show consistent residual moisture and reconstitution behavior across multiple batches has demonstrated cycle control; one who cannot has only demonstrated one good day in the lab. PeptidesFromChina’s documentation approach and characterization reporting checklist reflect the same dataset researchers should expect before trusting a batch’s cycle history.
What Actually Determines a Reliable Lyophilization Cycle?
The conventional advice on peptide lyophilization treats it as a template problem: pick a shelf temperature ramp, run it, check if the cake looks acceptable. That approach fails more often than the literature admits, because it skips the one step that actually defines a safe cycle: measuring Tg’ and Tc for the specific formulation in front of you, not a similar one from a paper.
What gets overrated is total cycle time. Teams chase shorter primary drying before they’ve defined a verified safe operating window, which is backward. The research is consistent on this point: define the thermal boundaries first, then shrink runtime through small, monitored steps once you know where the ceiling actually is. A cycle that finishes fast but occasionally collapses is worse than a slower one that passes every time.
What deserves more attention than it gets is documentation discipline. A cycle isn’t validated because it worked once. It’s validated because you have thermocouple traces, Karl Fischer results, and cake appearance data across multiple runs that agree with each other. Labs sourcing peptides or transferring cycles between sites should treat that dataset as non-optional, not paperwork to backfill after the fact.
If there’s one habit worth adopting immediately, it’s re-running thermal characterization every time a formulation changes, even slightly. Skipping that step is where most collapse failures actually originate.
— Sam Levin
Where PeptidesFromChina Fits Into Your Lyophilization Cycle Work
Products are subject to the manufacturer’s applicable quality-control procedures and specifications. Manufacturer-side analytical documentation may be available depending on the product and batch. PeptidesFromChina is not an independent analytical testing laboratory.
Consistent input characterization supports meaningful lot-to-lot comparisons in lyophilization work. Products are subject to the manufacturer’s applicable quality-control procedures and specifications. Manufacturer-side analytical documentation may be available depending on the product and batch. PeptidesFromChina is not an independent analytical testing laboratory. Buyers requiring independent verification may arrange third-party analytical testing. See the Epithalon catalog for current product information.
Key Takeaways
A peptide lyophilization cycle succeeds when freezing, primary drying, and secondary drying setpoints are all anchored to measured Tg’ and Tc data rather than assumed values.
Point Details Freeze with control Cool at 0.5–1.0°C/min to −40°C to −50°C, and anneal at −15°C to −20°C for 2 to 4 hours if mannitol is present. Keep primary drying safe Hold chamber pressure at 50–150 mTorr with product temperature 2–5°C below the measured Tc. Confirm the endpoint two ways Cross-check thermocouple convergence against Pirani/capacitance manometer divergence before ending primary drying. Target moisture, not just time Secondary dry to +25°C to +40°C until Karl Fischer confirms residual moisture below 1% w/w. Verify the starting material Products are subject to the manufacturer’s applicable quality-control procedures and specifications. Manufacturer-side analytical documentation may be available depending on the product and batch. PeptidesFromChina is not an independent analytical testing laboratory.